
Supplies needed:
Worsted/Aran weight yarn in orange
F hook
stuffing
felt or other material for stripes and nose (black and pink)
tapestry needle
12mm safety eyes
Everything is worked in continuous rounds, so it's a good idea to use a stitch marker to keep track of them. I started everything with magic circles, but if you aren't comfortable with them you can ch 2 and put the first rnd into the first ch.
Head:
rnd 1: 6 sc in ring
rnd 2: 2 sc in each st [12]
rnd 3: (sc in next st, 2 sc in next st) x6 [18]
rnd 4: (sc in next 2 sts, 2 sc in next st) x6 [24]
rnd 5: (sc in next 3 sts, 2 sc in next st) x6 [30]
rnd 6: (sc in next 4 sts, 2 sc in next st) x6 [36]
rnd 7: (sc in next 5 sts, 2 sc in next st) x6 [42]
rnd 8: (sc in next 6 sts, 2 sc in next st) x6 [48]
rnds 9-16: sc in each st around
rnd 17: (sc in next 6 sts, sc 2 together) x6 [42]
rnd 18: (sc in next 5 sts, sc 2 together) x6 [36]
rnd 19: (sc in next 4 sts, sc 2 together) x6 [30]
rnd 20: (sc in next 3 sts, sc 2 together) x6 [24]
attach safety eyes
rnd 21: (sc in next 2 sts, sc 2 together) x6 [18]
Stuff head. Continue to fill as you finish the head.
rnd 22: (sc in next st, sc 2 together) x6 [12]
rnd 23: sc 2 together around [6]
close any remaining hole with a sl st, finish off, bury end
Muzzle:
rnd 1: 6 sc in ring
rnd 2: 2 sc in each st [12]
rnd 3: (sc in next 3 sts, 2 sc in next st) x3 [15]
rnd 4: sc in each st around
st sl into next st, finish off leaving a long end for attaching the muzzle to the face.
Ears (make 2):
rnd 1: sc 4 in ring
rnd 2: 2 sc in each st [8]
rnd 3: (sc in next 3 sts, 2 sc in next st) x2 [10]
rnd 4: (sc in next 4 sts, 2 sc in next st) x2 [12]
rnd 5: (sc in next 5 sts, 2 sc in next st) x2 [14]
rnd 6: sc in each st around
sl st in next st, finish off leaving a long end for attaching. Ears do not need to be stuffed.
Body:
rnd 1: 6 sc in ring
rnd 2: 2 sc in each st [12]
rnd 3: (sc in next st, 2 sc in next st) x6 [18]
rnd 4: (sc in next 2 sts, 2 sc in next st) x6 [24]
rnd 5: (sc in next 3 sts, 2 sc in next st) x6 [30]
rnd 6: (sc in next 4 sts, 2 sc in next st) x6 [36]
rnds 7-15: sc in each st around
rnd 8: (sc in next 4 sts, sc 2 together) x6 [30]
rnd 9: sc in each st around
rnd 10: sc in next 3 sts, sc 2 together) x6 [24]
sl st in next st, finish off leaving a long end for attaching. Stuff.
Legs (make 4):
rnd 1: 6 sc in ring
rnd 2: 2 sc in each st [12]
rnd 3: sc in each st around
rnd 4: (sc in next 4 sts, sc 2 together) x2 [10]
rnd 5-11: sc in each st around
sl st in next st, finish off leaving a long end for attaching. Stuff.
Tail:
rnd 1: 6 sc in ring
rns 2-15: sc in each st around
sl st in next st, finish off leaving long end for attaching. Tail does not need to be stuffed.
Assembly:
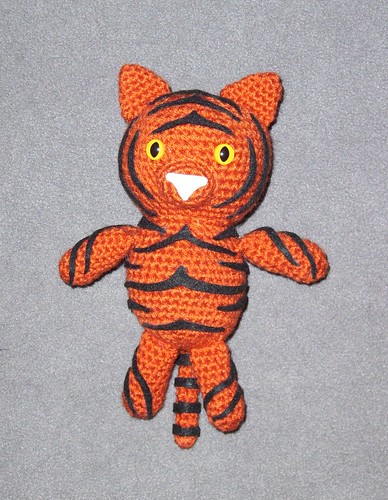
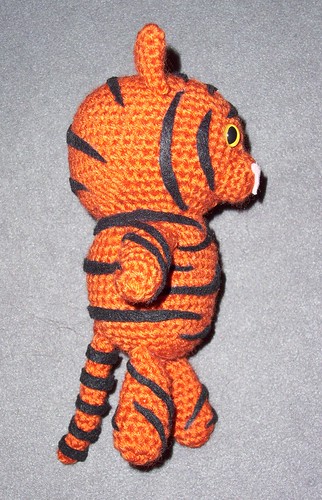
Using the pictures as a guide, attach the ears to the top of the head. I wanted to attach the body before I attached the muzzle - sew body to bottom of head, then stuff the muzzle and sew it onto the face. Sew the legs closed, and then attach two of the legs to the sides of the body shortly below the neck, and two to the bottom. Finally, attach the tail.
I do not have embroidery skills, so I cut out felt stripes and glued them to my tiger with felt glue. You can do that using pictures as a guide, or if you can embroider feel free to give it stripes that way. Tigers have pink noses, so I used pink felt on the muzzle.
Voila! You have a tiger.